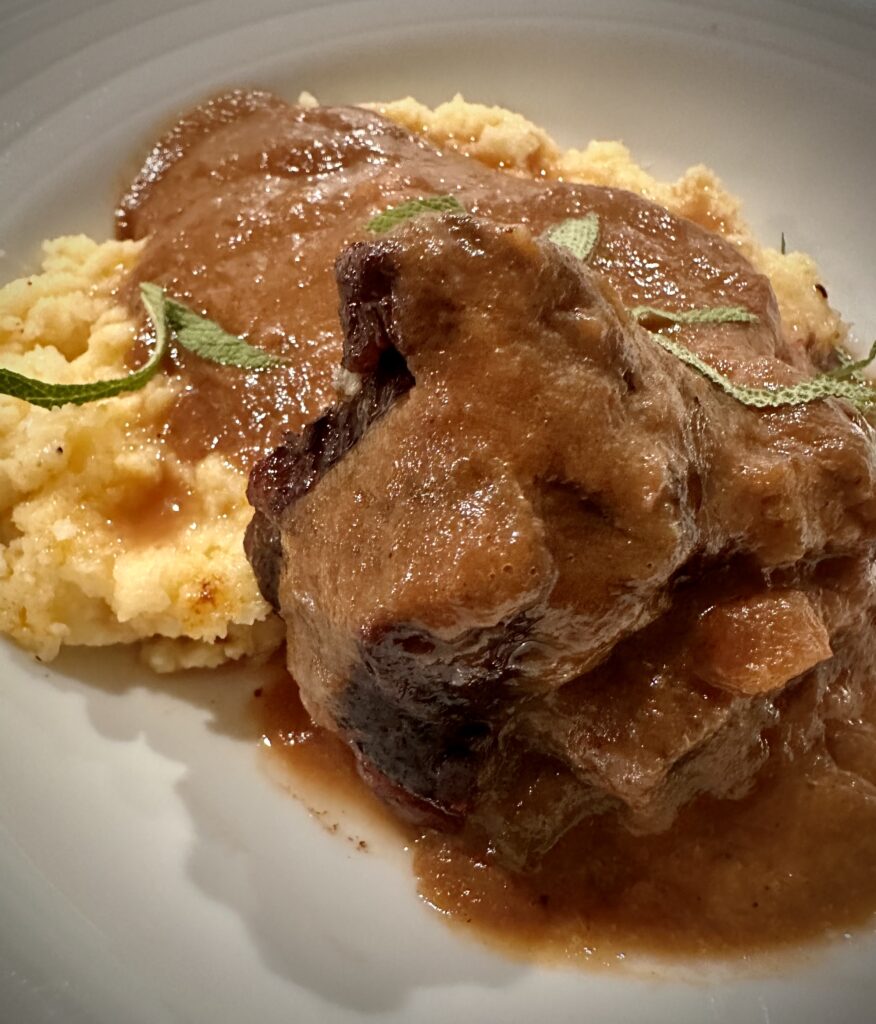
Short ribs slowly braised in red wine sauce made with aromatic vegetables and fresh herbs until they are completely fall-apart tender. Serve over creamy polenta or mashed potatoes for a boldly flavored and beyond comforting meal!
You don’t need to wait until the holidays to make these Wine Braised Short Ribs. This recipe is easy enough for a lazy weekend dinner!
Enjoy!
Wine Braised Short Ribs
Short ribs slowly braised in red wine sauce made with aromatic vegetables and fresh herbs until they are completely fall-apart tender.
Preheat oven to 300°. Season short ribs heavily with salt and pepper. Heat oil in a large Dutch oven over high heat. Brown short ribs on all sides, about 8 minutes per batch. Remove the ribs and transfer to a plate. Pour off all but approximately 2 Tbsp. drippings from pot.
Add onions, garlic, carrots, and celery to pot and saute about 5 minutes. Add tomato paste; cook, stirring constantly. Stir in water, wine, then add short ribs with all the juices. Add the herbs, bring to a boil, cover, and transfer to oven.
Cook in the oven until short ribs are tender, 3–3 1/2 hours. Spoon fat from surface and discard. Transfer the ribs to a plate. Using a handheld blender puree the sauce. Reduce until desired thickness. Adjust the salt and pepper to taste.
Serve in shallow bowls over polenta or mashed potatoes with sauce spooned over.
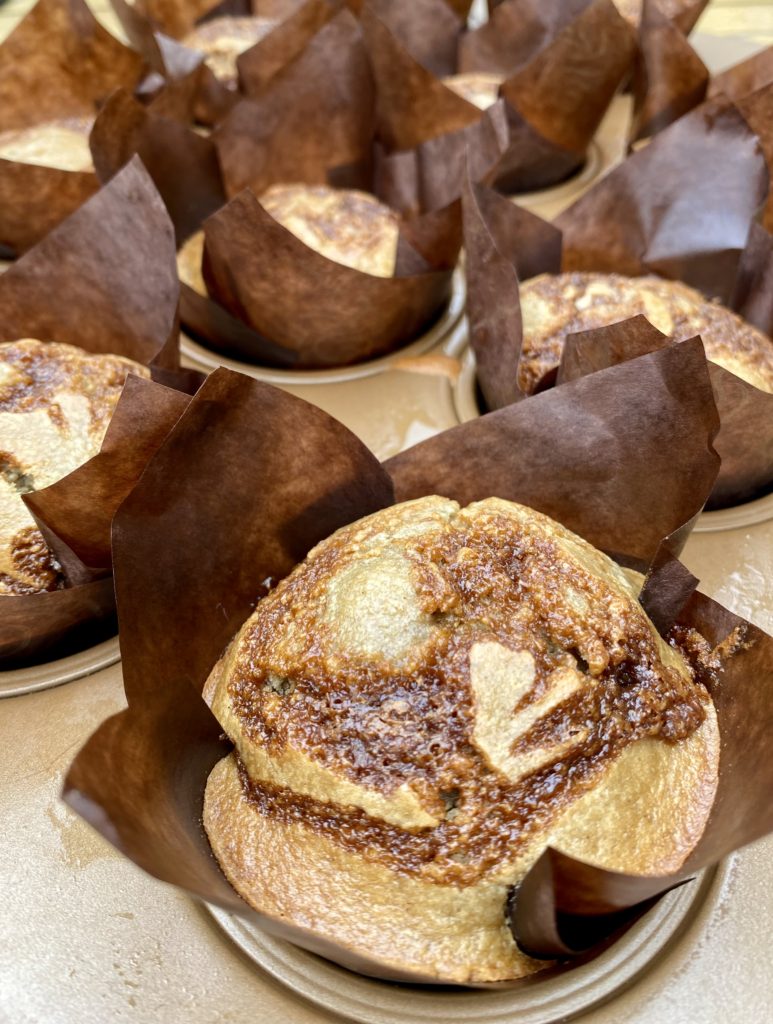
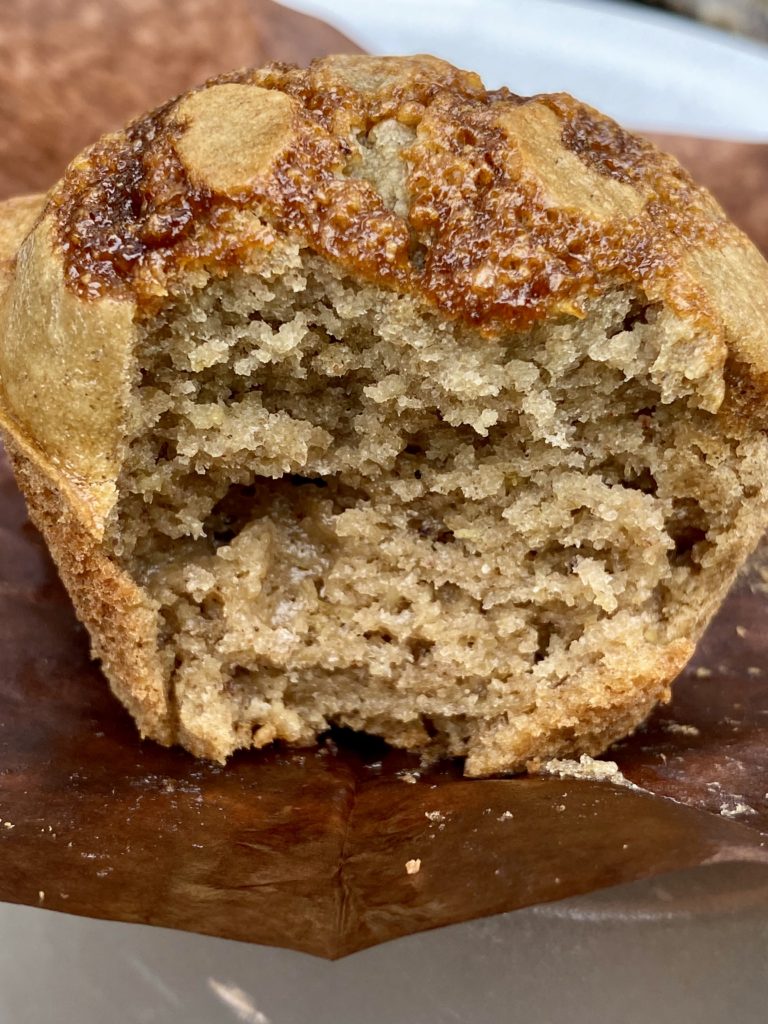
I’ve made these Blender Banana Oat Muffins enough times to say “we got sick of it!”…at least for now!
This Blender Banana Oat Muffins recipe started as an attempt to make a “healthiesh” banana muffin version. This recipe got its “GF” status accidentally. After tweaking with different flours the oats+tapioca starch combo worked best and the moistest-most flavorful-easy to make banana muffins were born!
Until we are cured from banana oats muffin fever and ready to crave it again, here is the recipe.
1tspapple cider vinegarcan substitute for white or rice vinegar
3tbspcoconut oil (refined)
1cupcoconut sugar can substitute with regular sugar
2cuprolled oats
2tbsptapioca startch
1/2tspsalt
1 1/2tspcinnamon
1tbspbaking soda
For 'the' drixzle
1/8cupprepared muffin batter (2-3 tbsp aprox)
1/2 tspcinnamon
1tspcoconut sugar or brown suggar
Equipment
Blender
Method
Preheat oven to 350°F. Grease or line the wells of a standard 12-cup muffin tin and set it aside.
In a blender or food processor, place the first 7 ingredients (liquid ingredients + sugar) and blend on high speed until well-blended.
Add the rest of the ingredients (dry) EXCEPT for the BAKING SODA! Blend in high speed until well-blended.
Add the baking soda to the muffin batter for less blending it on slow for a few seconds. NOTE: The batter should be liquidy and thin.
Divide the batter evenly among the the muffin tin slots, reserving approximately 1/8 cup or 2-3 tbsp (from blender scrapping)
Mix the reserved batter with the additonal sugar and cinammon and drizzled evenly over each filled muffin slot.
Place the muffin tin in the center of the preheated oven and bake for 20-30 minutes, or until a toothpick inserted in the center of a muffin comes out with a few moist crumbs attached. Remove from the oven and allow to cool in the baking sheet for 10-12 minutes before transferring to a wire rack to cool completely.
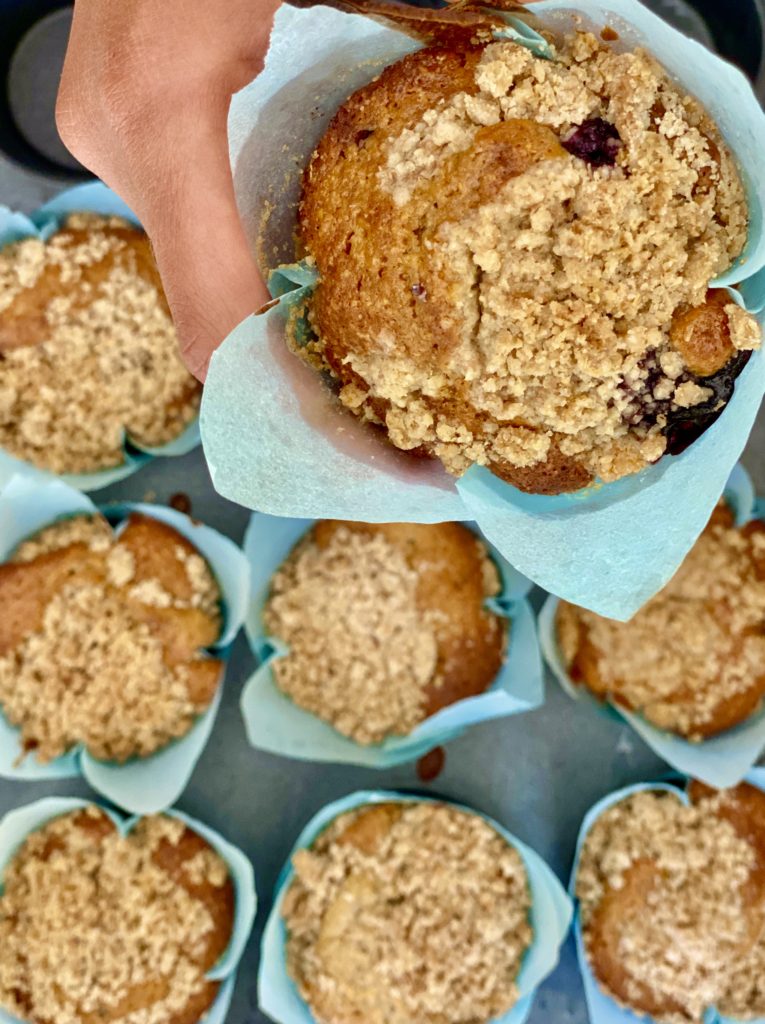
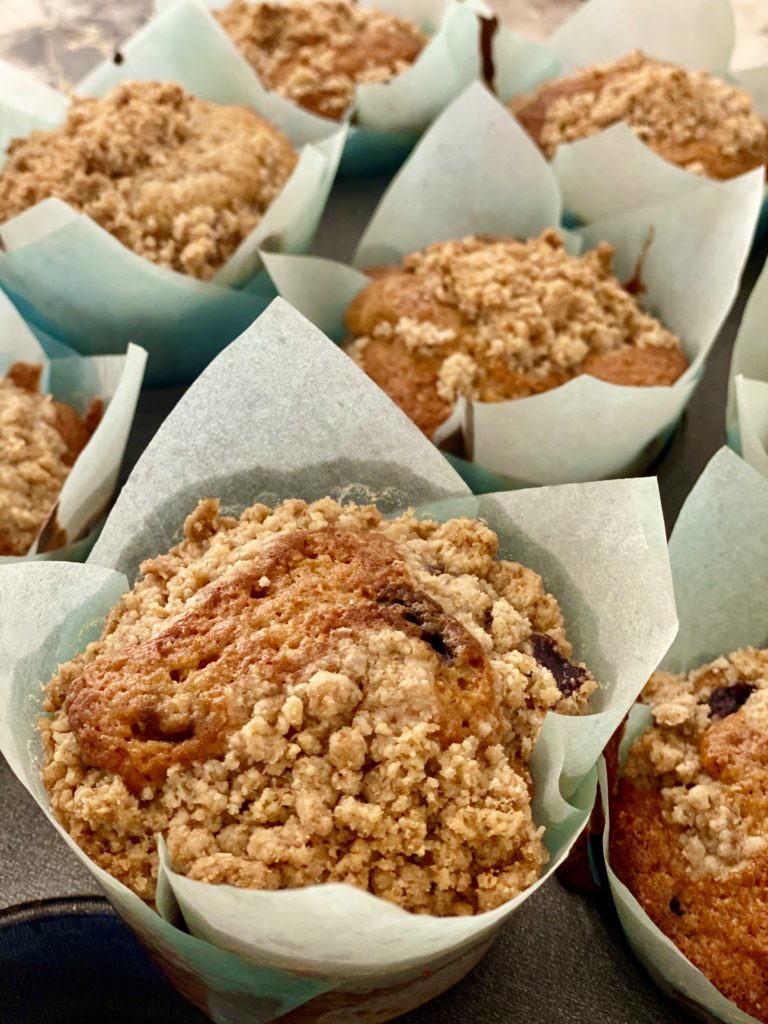
I made these Whole Wheat Blueberry Muffins for the first time at baking class in the Santa Monica Gourmandise School circa 2013. I haven’t stopped baking them since.
I have adapted the recipe a little bit by adding the crumb topping which, although optional, it’s highly recommended.
Whether you use fresh blueberries or frozen berries, it’s important to toss them in a little flour before folding into the Whole Wheat Blueberry Muffin batter. The coating keeps the blueberries from sinking to the bottom of the muffin tin/cup.
Add a few extra blueberries on top before adding the crumb topping for even more bursting flavor.
Whole Wheat Blueberry Muffins with Crumb Topping
These Whole Wheat Blueberry Muffins mix together quickly for a perfect morning treat. Crumbly and bursting with blueberries they turn out perfect every time!
2tbspextra whole wheat flour to coat the blueberries
Method
Preheat the oven to 350. Line a 12 cup muffin tin with cupcake liners.
Mix wet ingredients in a large bowl until the butter just forms tinny pebbles.
Pour the dry ingredients over the wet. Mix until combined. DO NOT over mix – it's ok to have a few streaks of flour or butter.
On a separate bowl toss the blueberries lightly with the the 2 tbsp of flour. Add blueberries to the batter and mix gently.
Spoon batter into prepared muffin tin.
Sprinkle with crumb mix (optional) or coarse sugar.
Bake at 350F for 20-30 minutes or until golden all over.
Crumb
In a small bowl, mix together 1/3 cup brown sugar, 1/4 of whole wheat flour, pinch of salt. Add in 2 tablespoons of melted butter. Mix until mixture resembles coarse cornmeal.
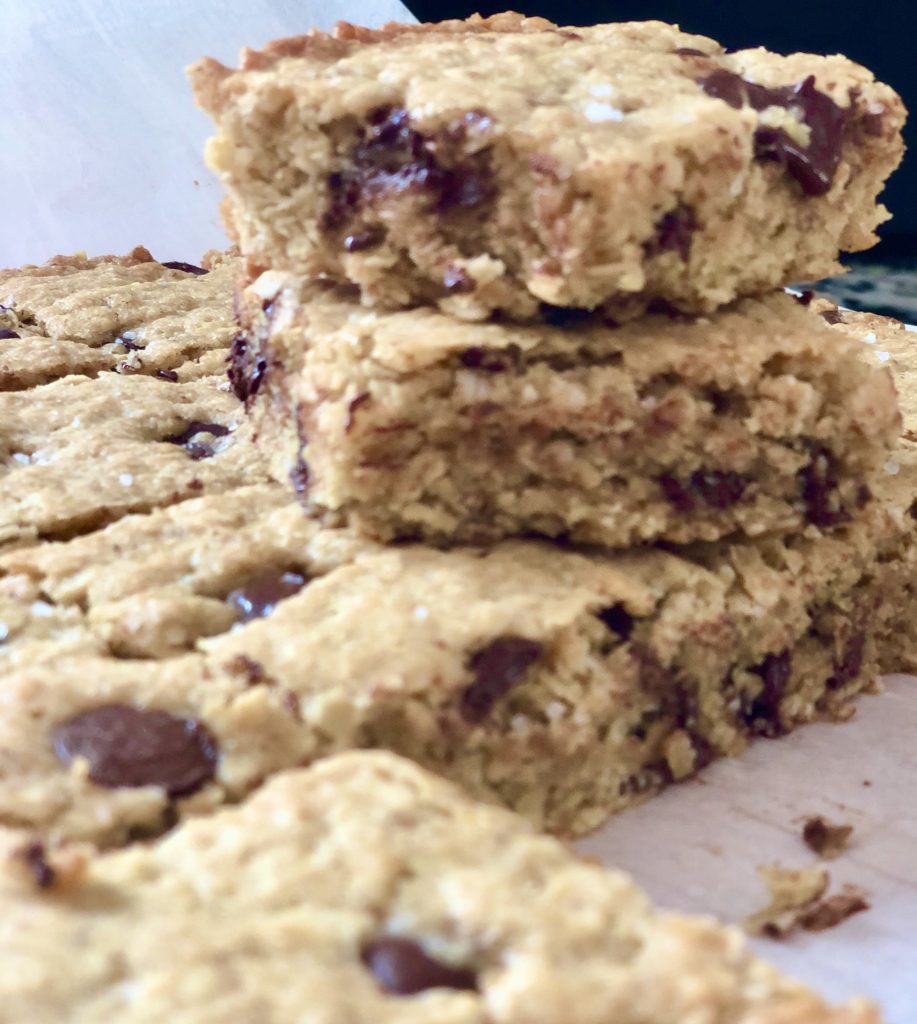
These one-bowl healthyish oatmeal chocolate chip bars are the perfect way to indulge without remorse. The bars come with a little less guilt than average cookies as they are made with oats, almond flour, coconut oil and olive oil, and less sugar than most cookie recipes. They are also ‘baking haters’ friendly as they require very little effort and are practically impossible to screw up.
A couple of notes:
I used 1/2 of olive oil and 1/2 coconut oil because quarantine times calls for whatever you have handy. Any kind of oil or even butter will work here but if you opt for butter the cookie bar will loose it’s “healthyish” status. Just sayin’.
Same goes for the flour. I used almond flour for balance but if you don’t have it handy you can totally use regular all purpose flour or even whole wheat flour.
Healthyish Oatmeal Chocolate Chip Bars
These one-bowl healthyish oatmeal chocolate chip bars with dark chocolate chips and a sprinkle of flaky sea salt come with a little less guilt than cookies as they are made with oats, almond flour, coconut and olive oil, and less sugar than the average cookie.
Preheat the oven to 350 degrees F. Grease a 9×13 inch baking dish or line with parchment paper.
In a large mixing bowl or the bowl mix the oatmeal, flours, sugars, baking powder, salt, coconut oil, eggs, and vanilla- in that order. Mix until all the ingredients are combined. The dough will be crumbly. Mix in the chocolate chunks.
Press the dough into the baking dish. Bake 18-20 minutes or until the edges are set and the dough is golden. Sprinkle with flaky salt (not optional haha). Let it cool andcut into bars.
Keyword cookie bar, healthy bar, healthy cookie bar
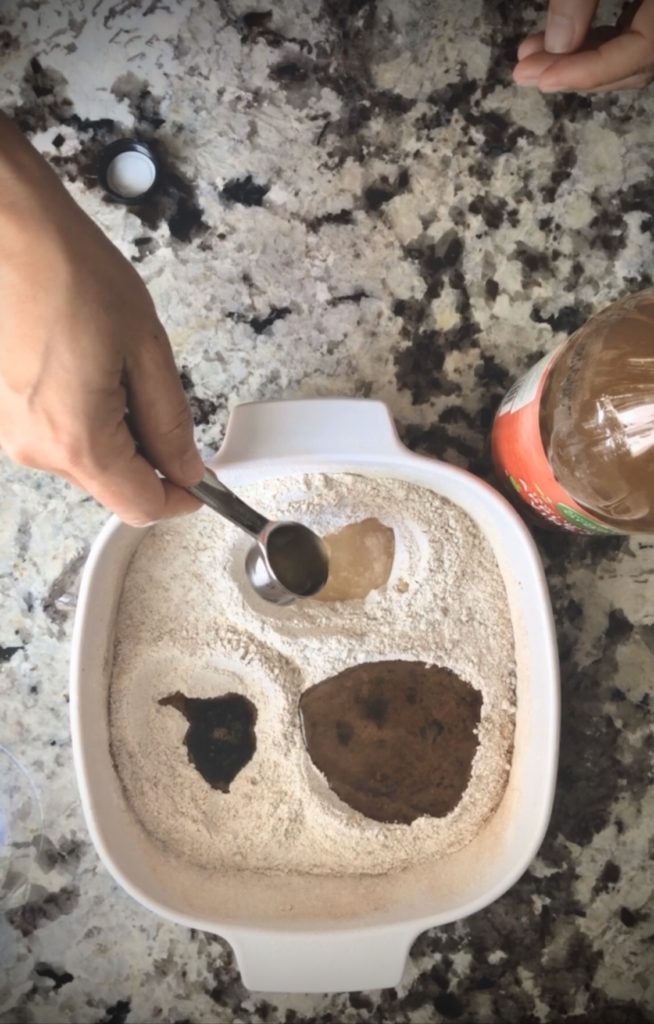
Crazy Cake or Wacky Cake or Depression Cake has a new name now: Quarantine Cake! No eggs, milk or butter and you don’t even need a bowl. Everything is mixed in the baking dish! This Snickerdoodle Crazy Cake is super easy to make, moist and fluffy!
Start by reheating the oven to 350 degrees F. Spray an 8″x 8″ baking dish with cooking spray or coat it with oil using your finger.
Mix the dry ingredients (flour, sugar, brown sugar, cinnamon, baking soda, and salt) in the baking dish until well blended. Make 3 depressions in the mixed dry ingredients. Add the vinegar in one depression, vanilla in the other and the vegetable oil in the third larger depression. Mis slightly then pour the water over. Mix well until smooth. Do not over mix.
Bake for approximately 35 minutes. While the cake is baking, mix the cinnamon and sugar for the topping. Once cake is done and still warm, sprinkle the cinnamon sugar mixture over the top.
SNICKERDOODLE CRAZY CAKE (NO EGGS, MILK OR BUTTER)
Crazy Cake or Wacky Cake or Depression Cake has a new name now: Quarantine Cake! No eggs, milk or butter and you don’t even need a bowl. Everything is mixed in the baking dish! This Snickerdoodle Crazy Cake is super easy to make, moist and fluffy!
Preheat oven to 350 degrees F. Spray an 8″x 8″ baking dish with cooking spray or coat it with oil.
Mix dry ingredients in the prepared baking dish. Make 3 depressions in dry ingredients (see photo). Add the vinegar in one depression, vanilla in the other and the vegetable oil in the third larger depression. Mix everything slightly and then pour water overall. Mix well until smooth. Do not over mix!
Bake for proximately 30 minutes or until cake is done (you can use the toothpick method but I like to push the center of the cake slightly with my fingers. If fluffy and it pushes back cake is done)
Mix the cinnamon and sugar for the topping and pour evenly over the still warm cake.
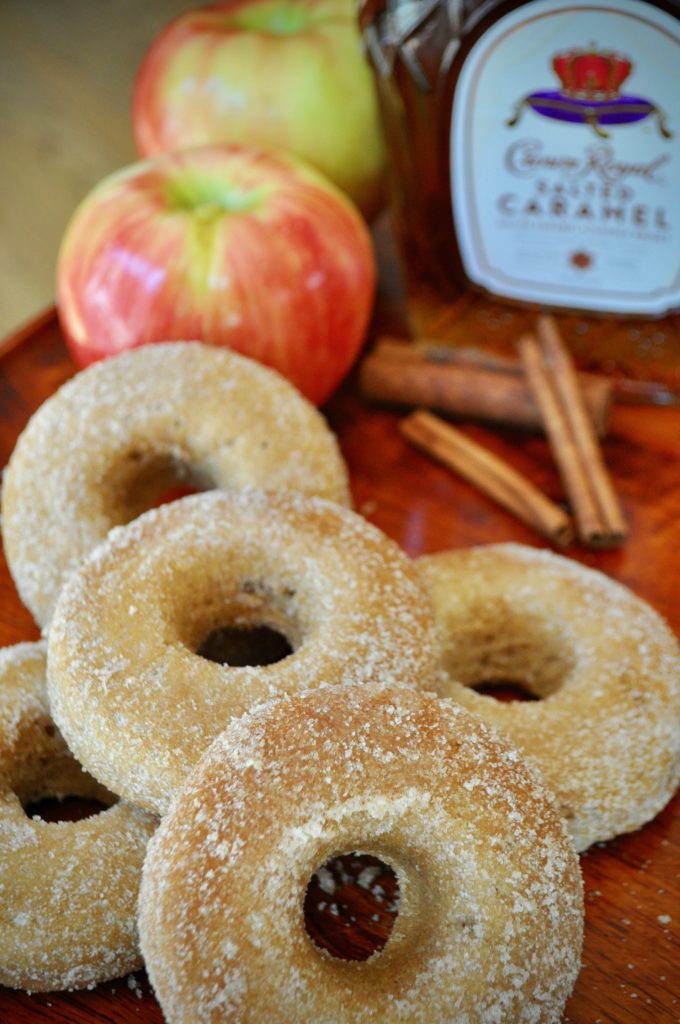
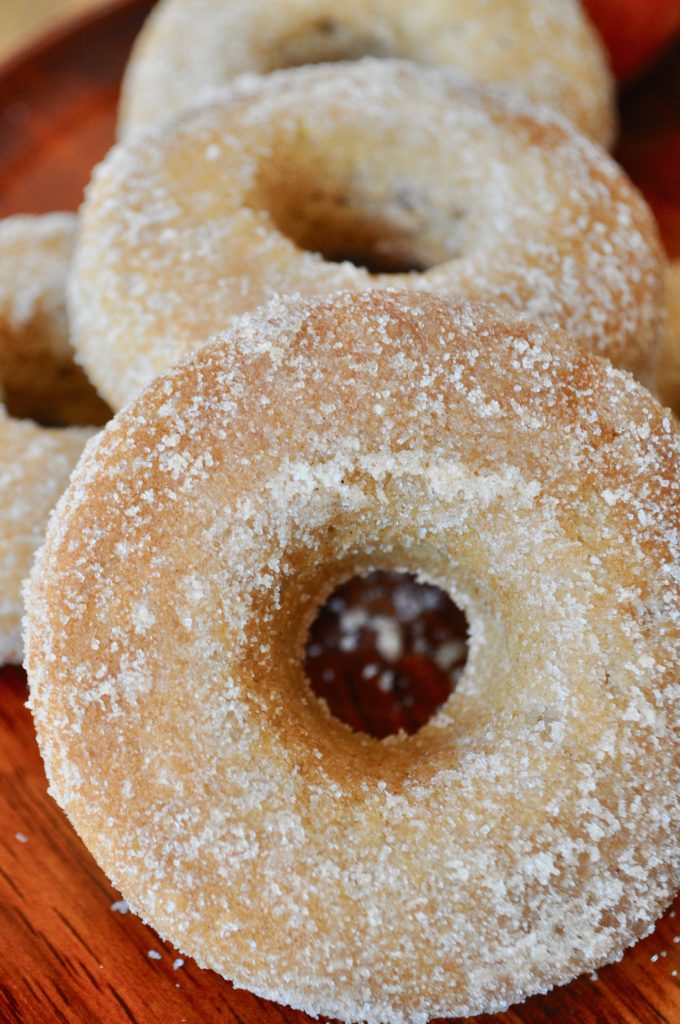
Coated in whisky butter and cinnamon sugar, these apple cider baked donuts have become a staple on our fall table
I’m wasting no time here telling you why it has been a while since I last posted a recipe. Time is such commodity these days. Although I have lots of recipes saved to be developed and published here, I’m choosing to skip them all and go straight to this apple cider baked donuts recipe. I made them yesterday and I needed to share the recipe right away before fall is over! Go make them. You can thank me later.
These apple cider baked donuts are somewhat dense and very muffin-like but once you coat them with the whisky+butter mix they become a little heavier with a moister crumb. Apple, cinnamon, spice and boozy butter taste all over. They taste and look like they’re straight from a bakery but with the ‘booze’ benefits.
The trick to these apple cider baked donuts is to flavor and moist them with the whisky butter – I used Crown Royal salted caramel whisky for even more flavor. It locks in the moist and brings these light but full of spice donuts to another level. But, if you are not into booze in your donuts, the whisky can be replaced for maple syrup, honey or nothing at all. Butter with a pinch of salt will do!
These couldn’t be easier to make– and less messy than fried donuts! Here are some notes about the recipe:
As mentioned, you can replace the “booze” for maple syrup, honey, or simply use the melted butter with a pinch of salt.
You can use regular apple cider but I recommend using a hard cider. The fermentation in the hard cider reacts with the baking powder creating a creamier but fluffy donut batter. There are a lot of hard ciders out there, but I like the semi-sweet and deep flavor of Samuels Smith’s Cider. Plus, I sip on whatever is left after mixing the batter. Win win!
Apple cider baked donuts with whisky butter
Coated in whisky butter and cinnamon sugar, these apple cider baked donuts have become a staple on our fall table.
1/3cuphard apple cider or regular apple cider (see above)
1/4cupbuttermilk or plain yogurt
1tspvanilla extract
1/2 cupbroen sugar
1/2 cupgranulated sugar
2largeeggs
4ouncesunsalted butter (1 stick)
For the whisky butter
2ouncesunsalted melted butter (1/2 stick)
2tbspCrown Royal Salted caramel or whatever whisky you have available
Cinnamon sugar coating
1cupgranulated sugar mixed with 1 1/2 teaspoon of cinnamon
Equipment
four 6-cavity donut pans and piping bag (or large zip-close bag with a corner snipped off)
Method
Preheat the oven to 350 degrees F. Spray four 6-cavity donut pans with nonstick baking spray (be generous.)
In a large mixing bowl, combine the flour, baking powder, salt, cinnamon, nutmeg and lemon zest. Whisk it all together.
In a liquid measure cup, combine the cider, buttermilk or yogurt and vanilla.
In the bowl of a stand mixer fitted with the paddle attachment combine the butter, brown sugar, and granulated sugar. Mix on high until fluffy. Scrape down the bottom and sides of the bowl.
Add the eggs, one at a time, mixing well between each addition. Scrape the bottom and sides of the bowl again and again.
With the mixer on low, add a little bit of the flour mixture and then half of the cider mixture. Continue alternating between the two until the batter is combined. Remove the bowl from the stand mixer and, using a spatula, fold the batter a few times to make sure the ingredients are well distributed.
Transfer the batter to a piping bag or a large zip-close bag with a corner snipped off, and pipe into two of the donut pans. If you don't have two (just like me) bake one tray at a time but make sure you re-spray the pan with non-sticking baking spray.
Bake until the cake just springs back when gently touched, 15 to 20 minutes.
While the donuts bake, mix the melted butter and whisky. Reserve.
Turn the donuts out onto a cooling rack; immediately brush with whisky butter, then dip in the cinnamon sugar both sides.
I don’t know about you, but we don’t do a whole lot for Mother’s
Day. As in, I refuse to go out to brunch, lunch, dinner or whatever because we have
learned that lesson the hard way. It’s CHAOS!
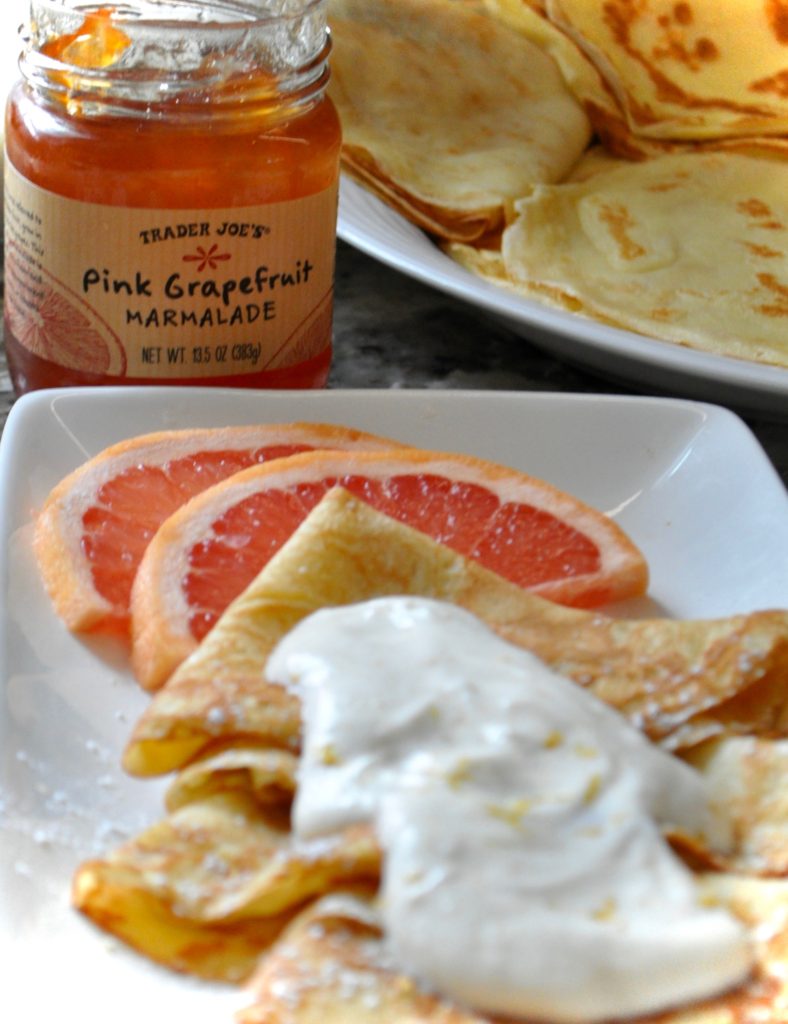
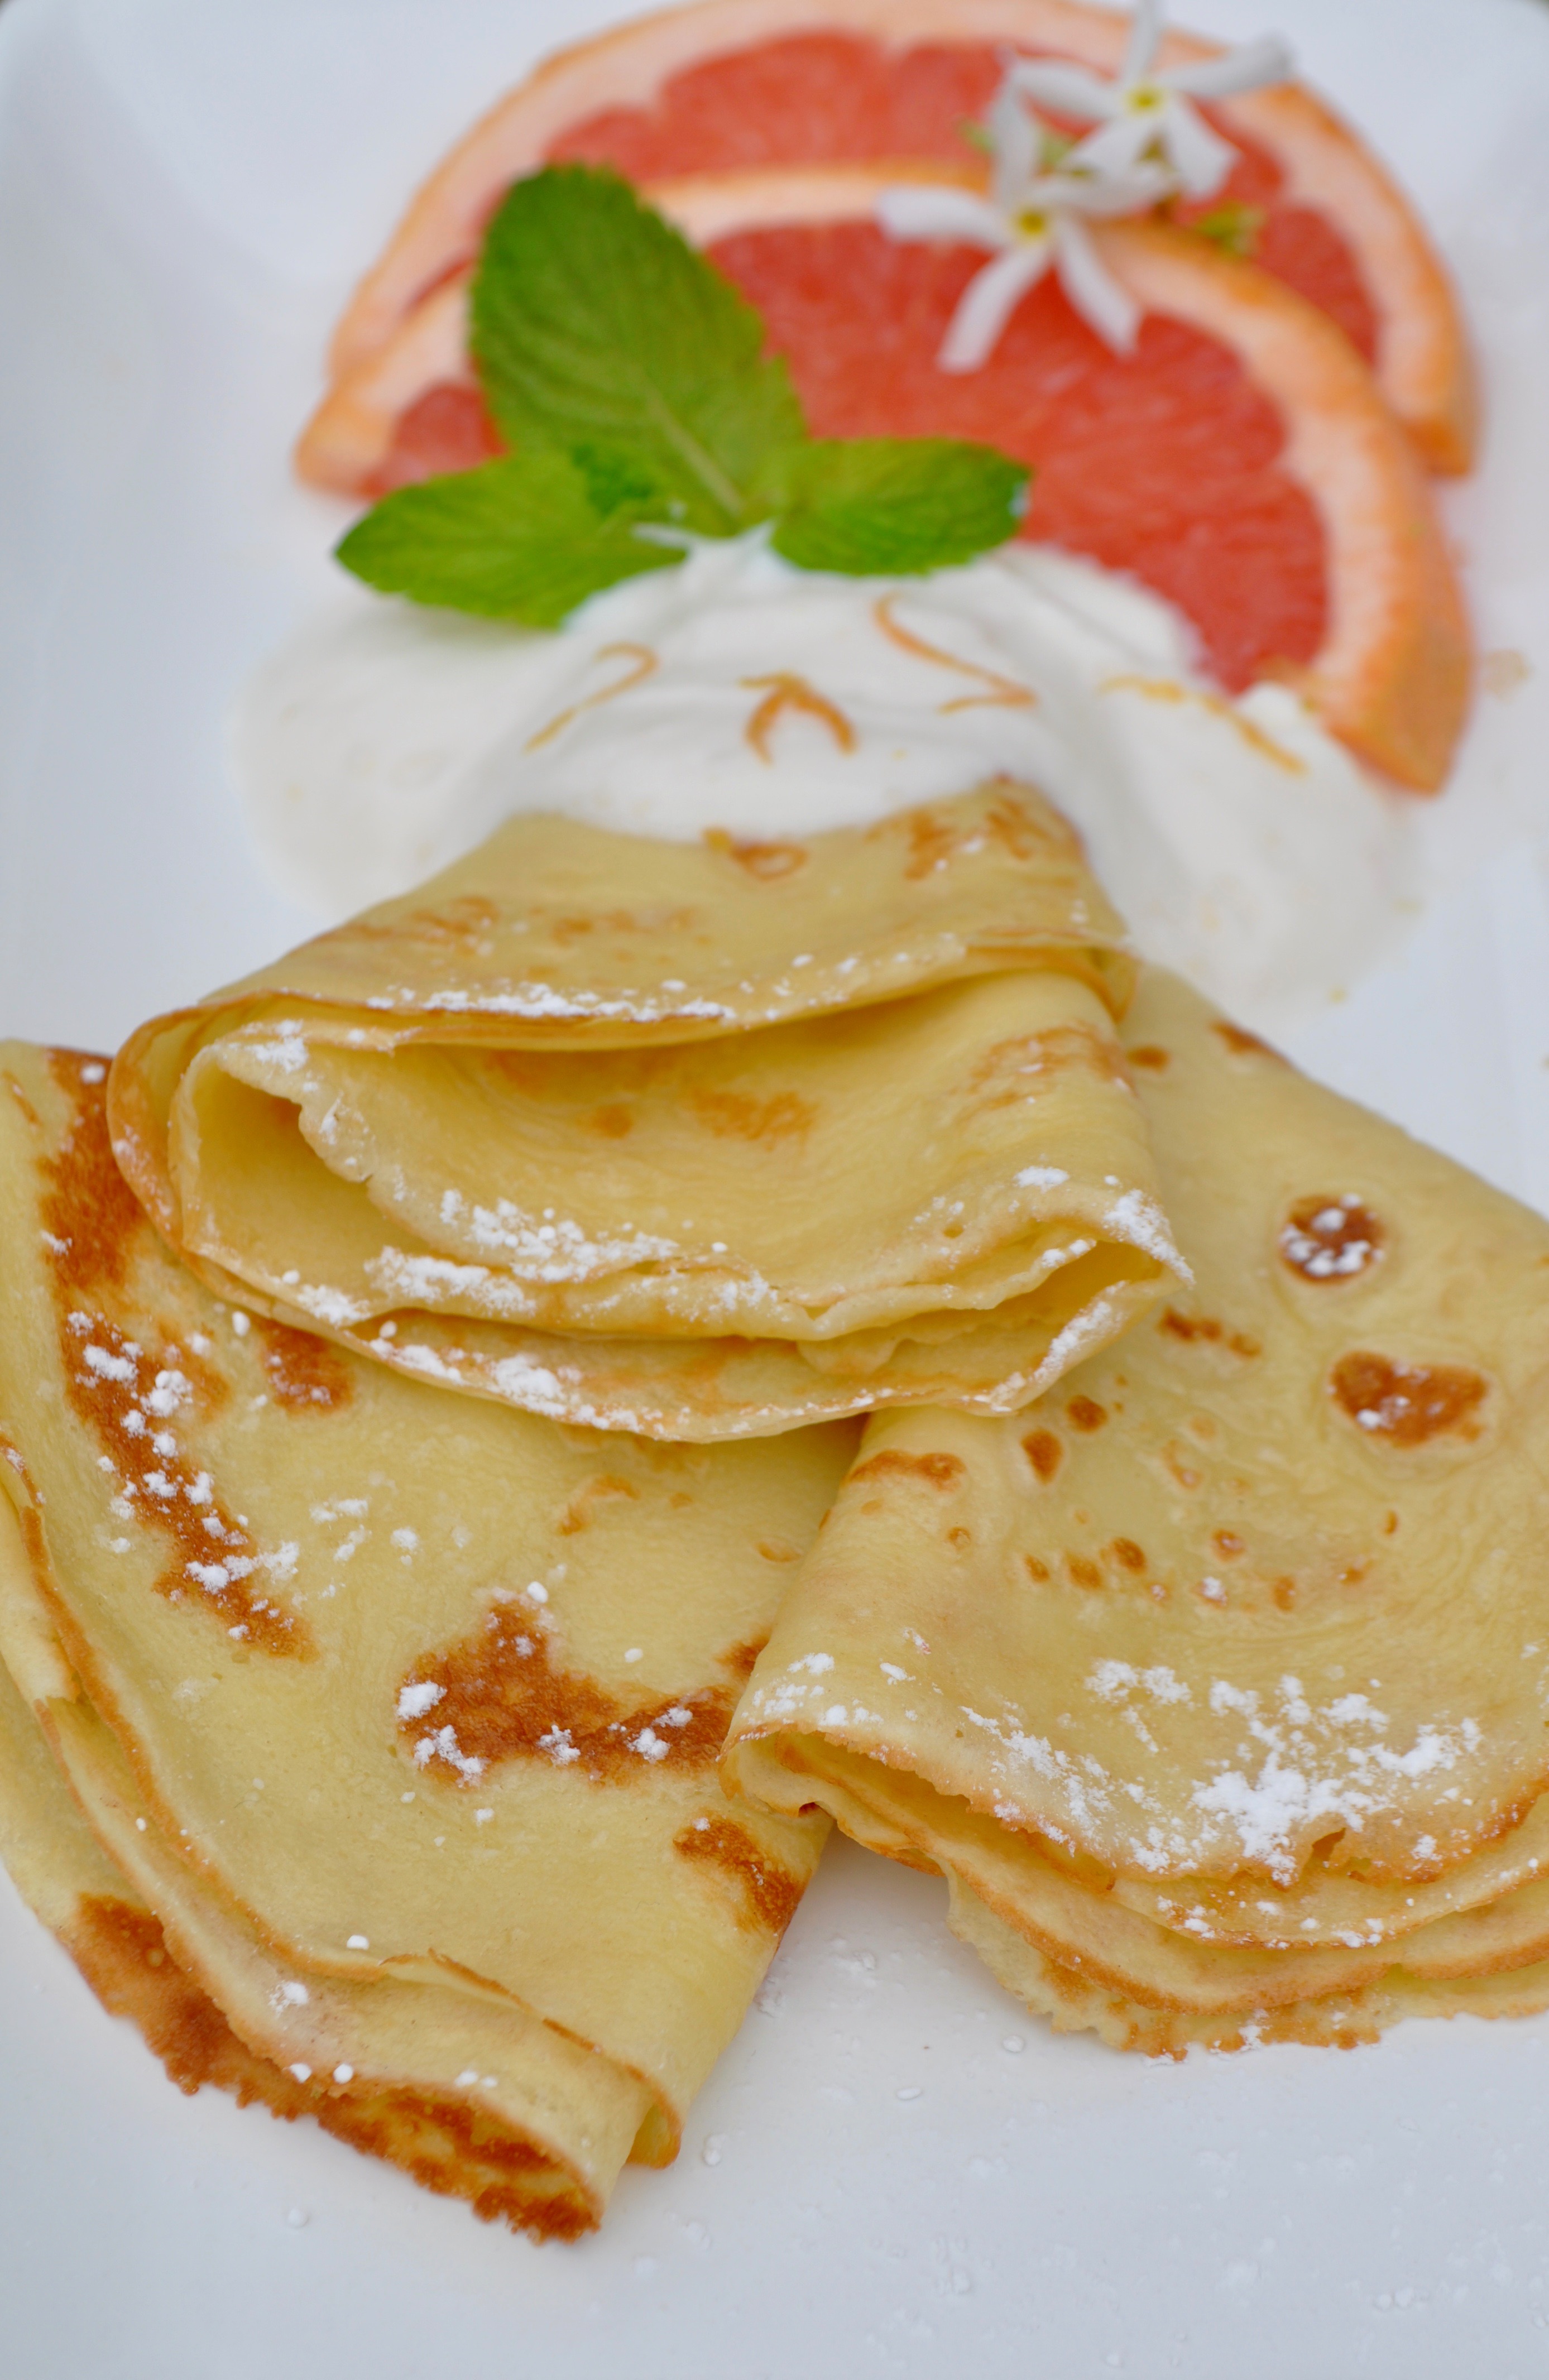
Call me a Mother’s Day party pooper but I’m all in for “at-home-Mother’s Day” and I won’t be mad if starts with crepes…with these grapefruit marmalade crepes with citrus whipped ricotta ‘specifically’!
The great news about this recipe is that it is super easy to make. The batter can be made up to one day ahead of time. Even better news: the crepes cook and taste better the longer the batter sits. Which means you (or the kids, and/or the significant other) can do most of the recipe prep ahead of time, including whipping up the ricotta.
Although I used grapefruit marmalade for the filling, you can make these crepes with your favorite marmalade or jam. The grapefruit zest and juice in the whipped ricotta can be replaced for any other citrus.
Here it is the quick video for the steps on how to make these grapefruit marmalade crepes with whipped citrus ricotta.
Happy Mother’s Day to all the mamas out there. May our day be filled with love and deliciousness!
Grapefruit marmalade crepes with whipped citrus ricotta
These easy grapefruit crepes are served with a dollop of whipped citrus ricotta. They are just as perfect for breakfast or brunch as they are for dessert!
Grapefruit marmalade (I used Trader Joes) or any jam/jelly of your choice
For the whipped citrus ricotta
2cupswhole fat ricotta (16 ounces)
1/2cuppowder sugar
1tbspgrapefruit zest
1/2tbspvanilla extract
1/4cupgrapefruit juice
Method
For the crepes
Combine all crepe ingredients in a blender. Process until smooth. Chill for at least 1 hour.
Heat an 8-inch nonstick crepe pan or skillet over medium heat. Coat pan lightly with butter or cooking spray. Pour about 3 tablespoons batter into pan; quickly tilt pan in all directions so batter covers pan with a thin film. Cook about 2 minutes. Carefully lift the edge of the crepe with a spatula to test for doneness. Turn crepe when it can be shaken loose from the pan and the underside is lightly browned; cook 1 minute or until center is set.
Place crepes on a plate and let it cool completely. Stack crepes between single layers of wax paper to prevent sticking.
For the whipped citrus ricotta
Combine the ingredients listed for the whipped citrus ricotta in the bowl of a food processor. Process for 10 to 15 seconds until smooth. Refrigerate until it is time to assemble and serve the crepes.
Assembling the crepes
Place 1 crepe on a small dessert plate; spread a thin layer of marmalade over each crepe. Fold each into a triangle. Top each serving with a dollop of the whipped citrus ricotta. Sprinkle crepes evenly with powdered sugar. Garnish with grapefruit slices and mint sprigs, if desired.
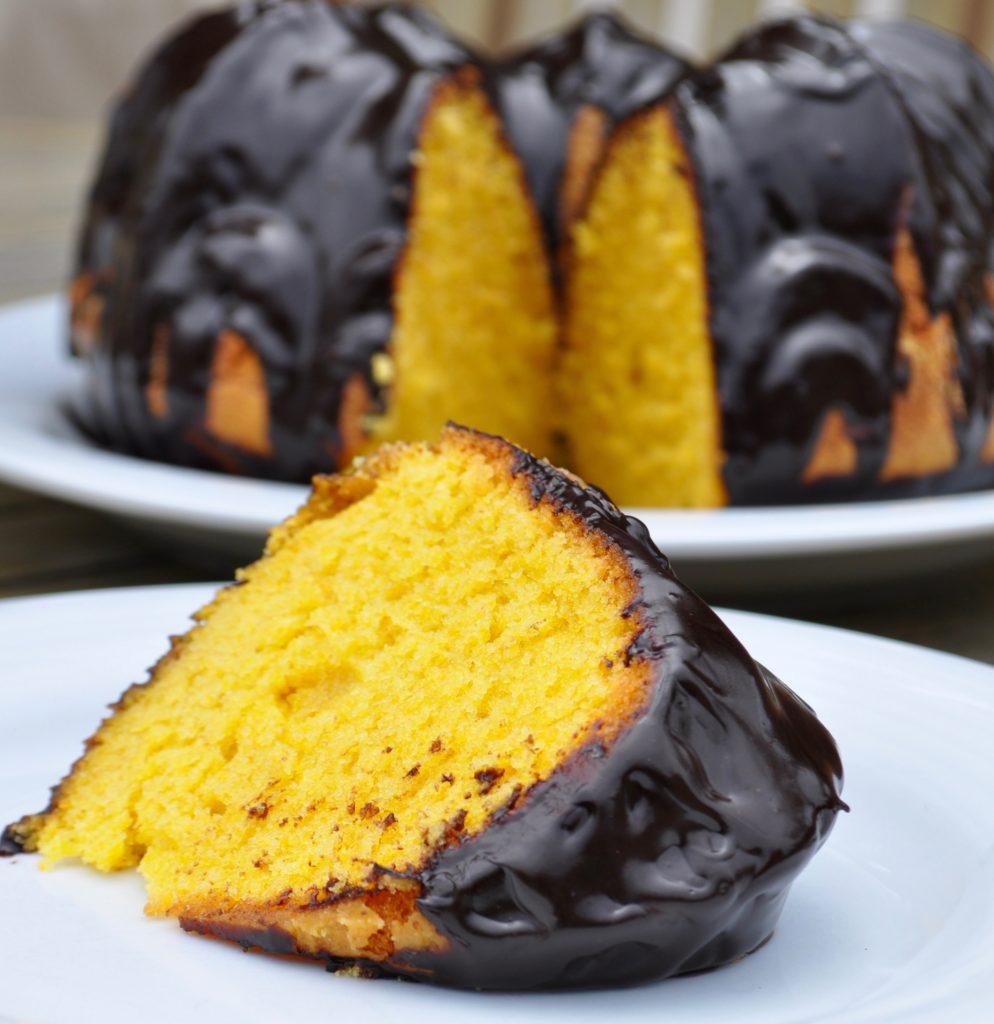
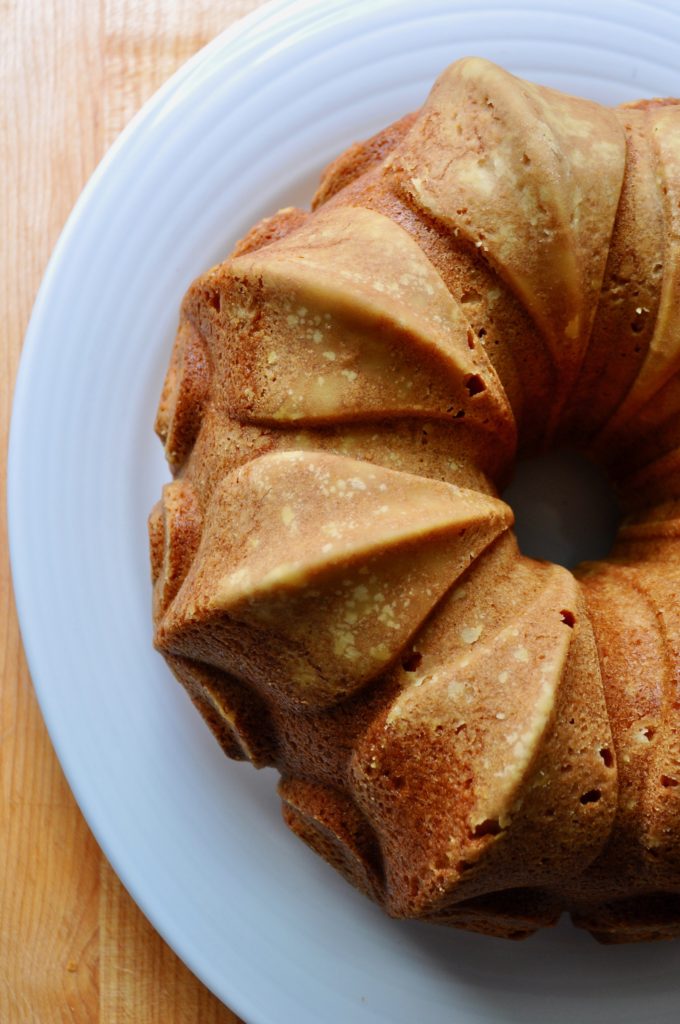
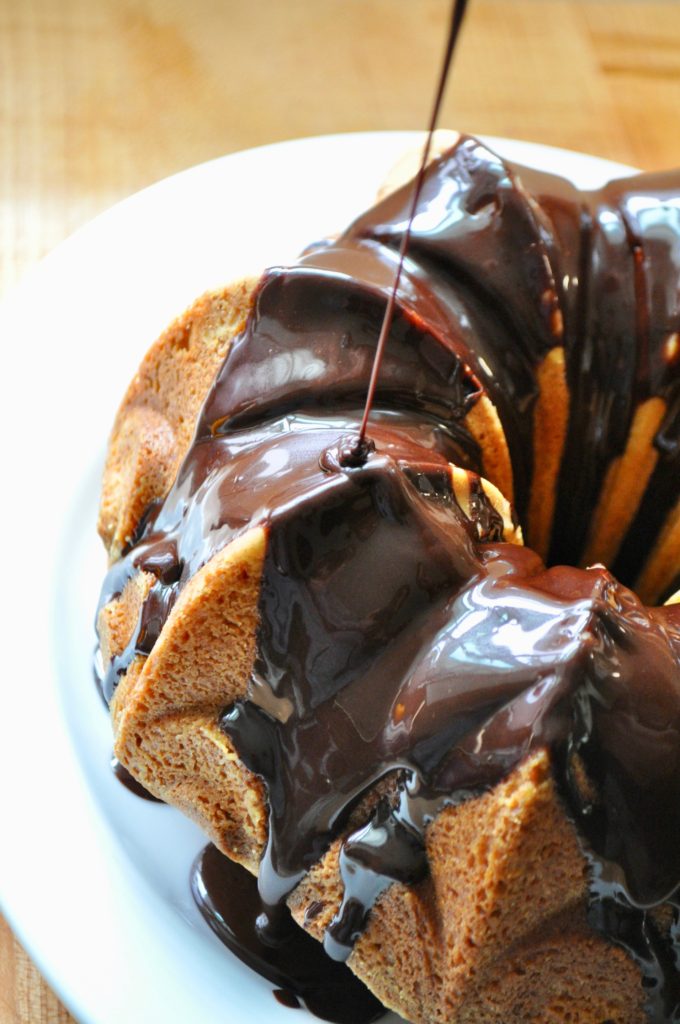
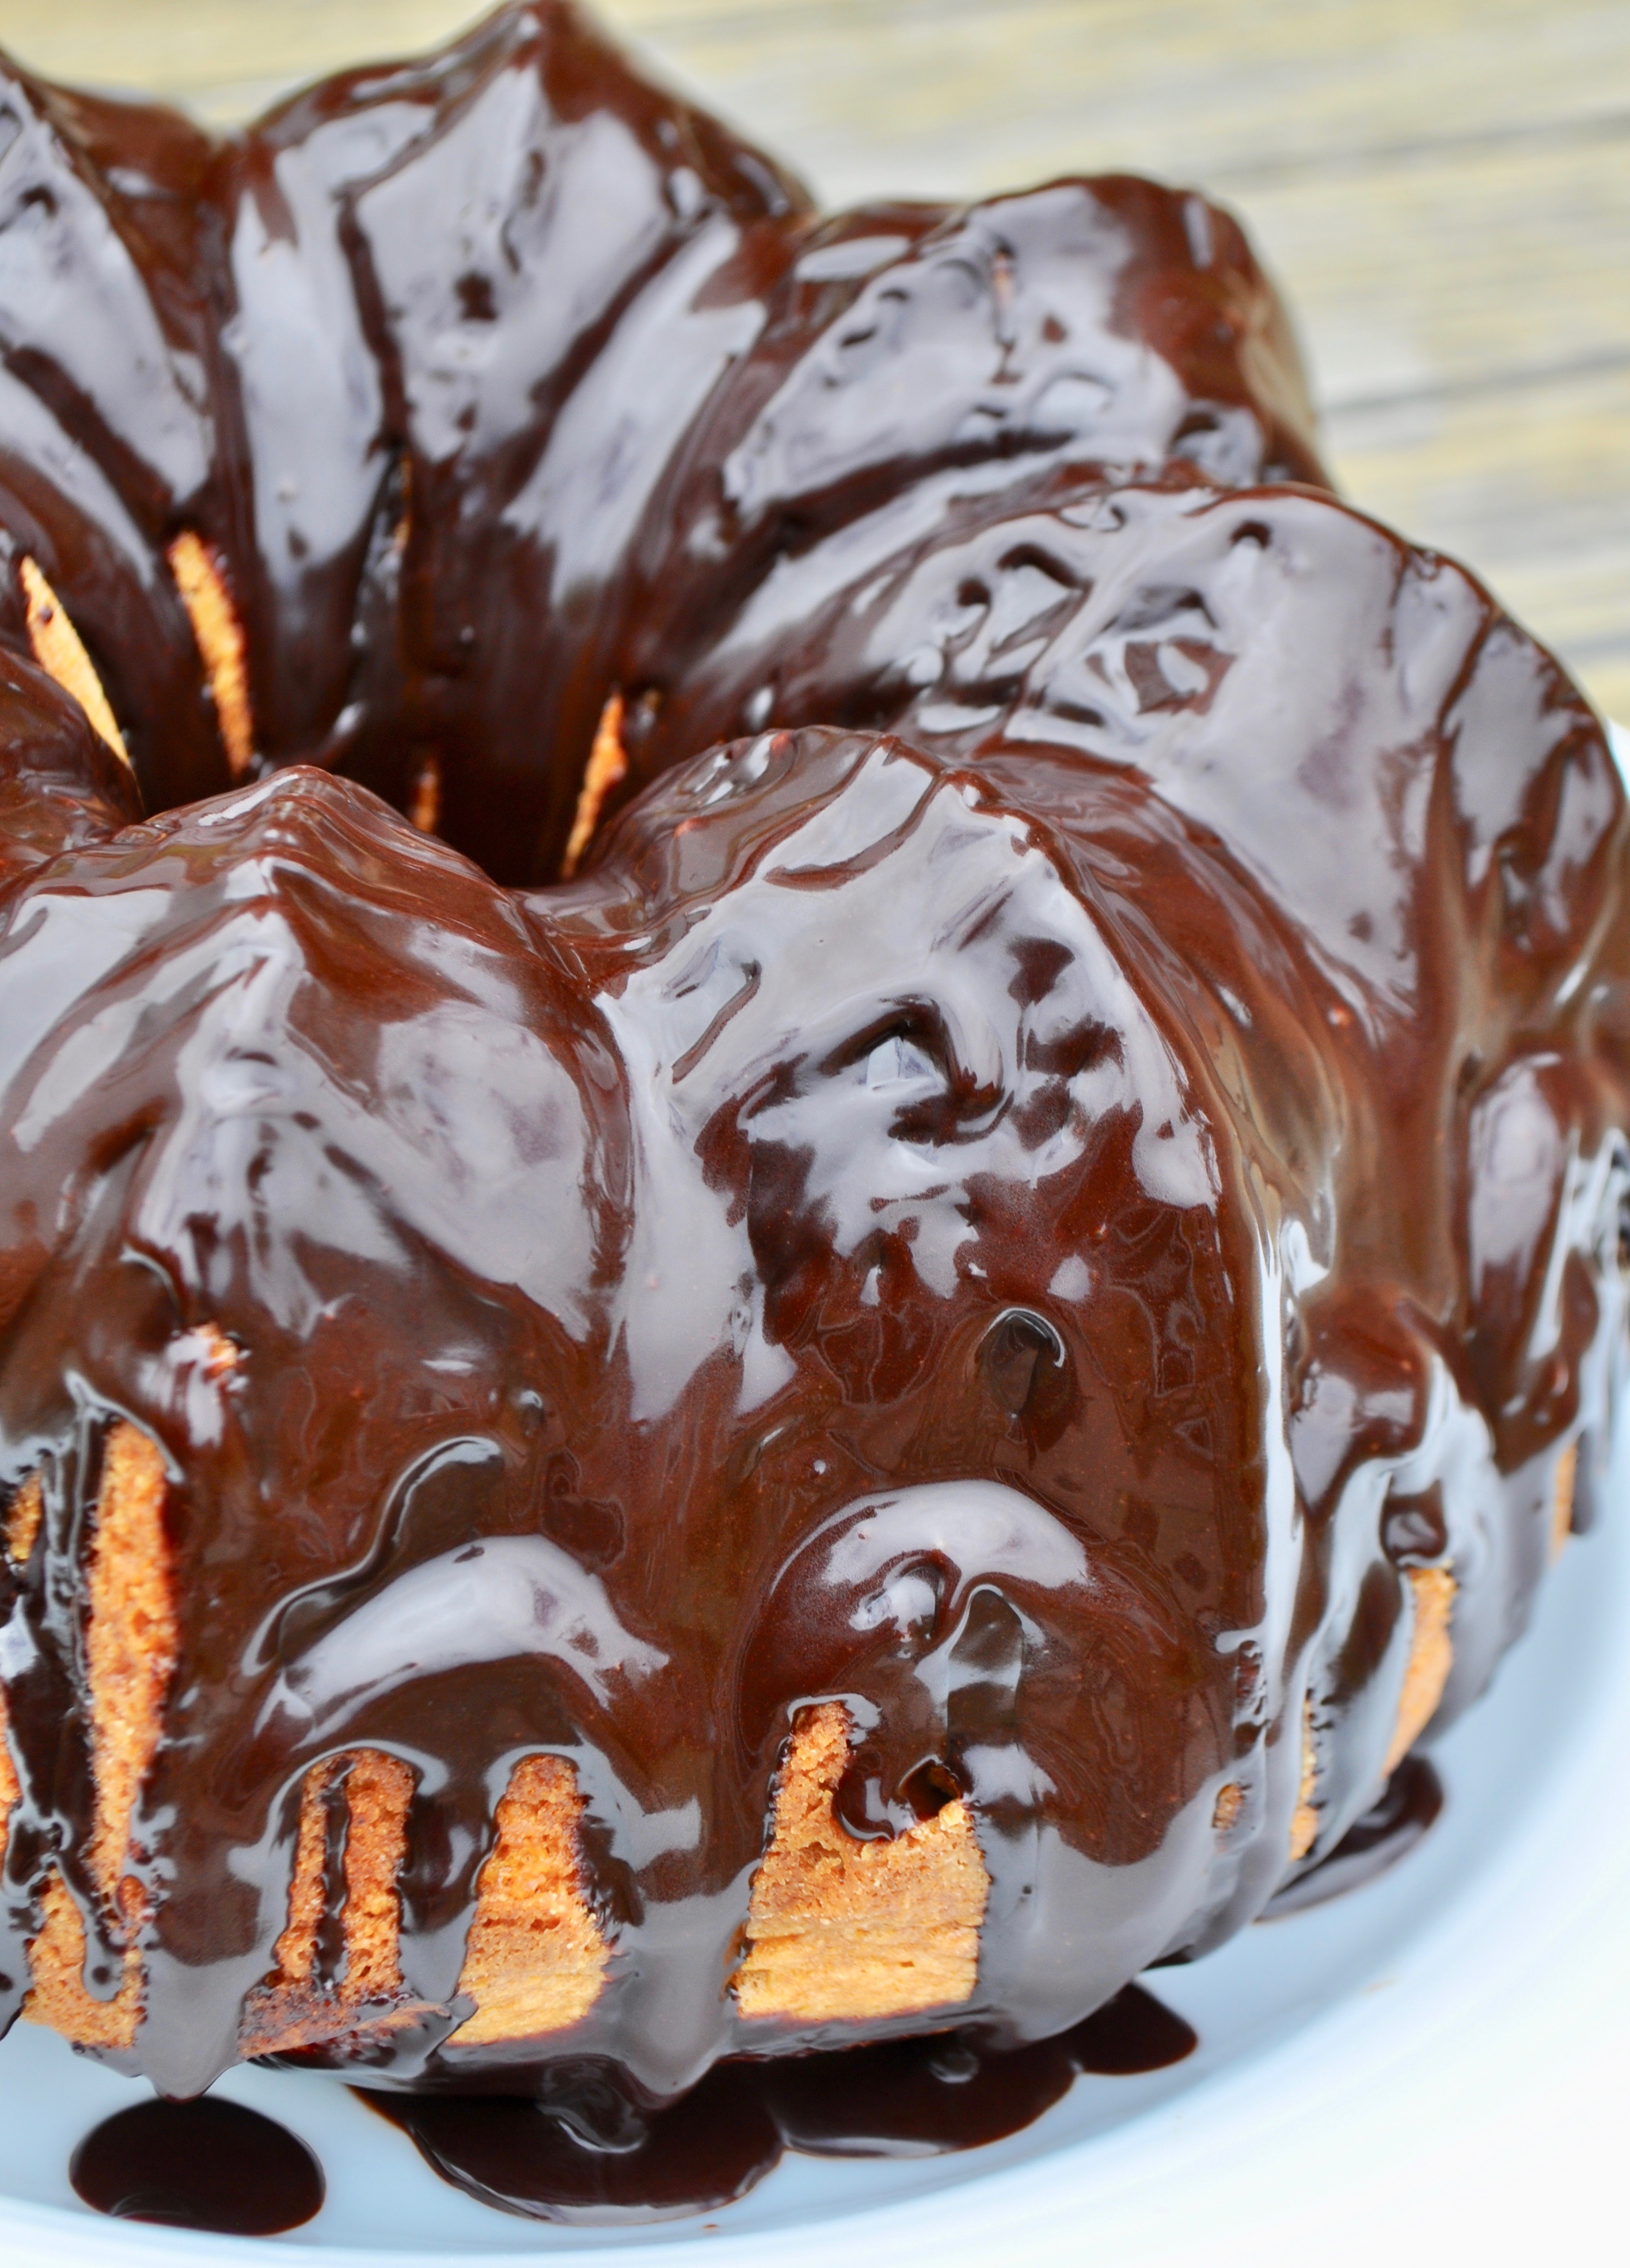
This is a simple and easy cake most of us Brazilians grew up eating – and also making! It is a light and fluffy carrot cake, dressed with a rich-gooey chocolate glaze.
At first glance, you may think this is not really a carrot cake because it has nothing to do with the chunky-moist-spice cake with thick cream cheese frosting that we loved here in America. This cake has no nuts, spice, raisins, or coconut but shares one defining trait with America’s loved carrot cake: the carrots!
In this Brazilian carrot cake whole chunks of raw carrot go straight into the blender with eggs, oil, and sugar to transform into a bright colorful batter.
You won’t spend more than 40 minutes from start to finish to make this carrot cake. First you blend the wet ingredients and carrots in the blender and then you pour the mixture into the dry ingredients. Mix everything well, bake for 25-30 minutes, make the glaze, wait for the cake to cool off (definitely the hardest part of this recipe), and drizzle the glaze all over.
The chocolate glaze purposely adds a hint of bitterness to this somewhat mellow cake. If you not into bitter chocolate, you may change your opinion after trying this chocolate glaze and carrot cake together. It is ‘muito bom’!
Brazilian carrot cake – Bolo de cenoura
5 from 1 vote
This is a simple and easy bundt cake most of us Brazilians grew up eating – and making! It is a light and fluffy carrot cake, dressed with a rich-gooey chocolate glaze.
Heat the oven to 350°F with a rack in the center. Spray a 10-inch (25cm) Bundt pan and dust with flour, tapping out the excess.
Sift the flour, baking powder and salt in a large bowl. Reserve. Pile the carrots, oil, eggs, and sugar in the blender. Blend until completely smooth. Pour the mixture into the bowl with dry ingredients. Fold in the dry ingredients with a spatula until no traces of flour remain.
Pour the batter into the prepared pan and bake for 20- 30 minutes or until a toothpick stuck in the middle comes out clean.
Let the cake cool in the pan for 10 minutes, then turn it out onto a rack set over a rimmed baking sheet to finish cooling.
Make the glaze
Add all ingredients for the glaze in a saucepan. On medium heat, bring glaze into a simmer, with a rubber spatula, until the glaze is well-melted and smooth. Remove from heat and let it cool off for 5 minutes. Add heavy cream and mix well.
Spoon the glaze over the cake and leave it to set a bit before slicing and serving.
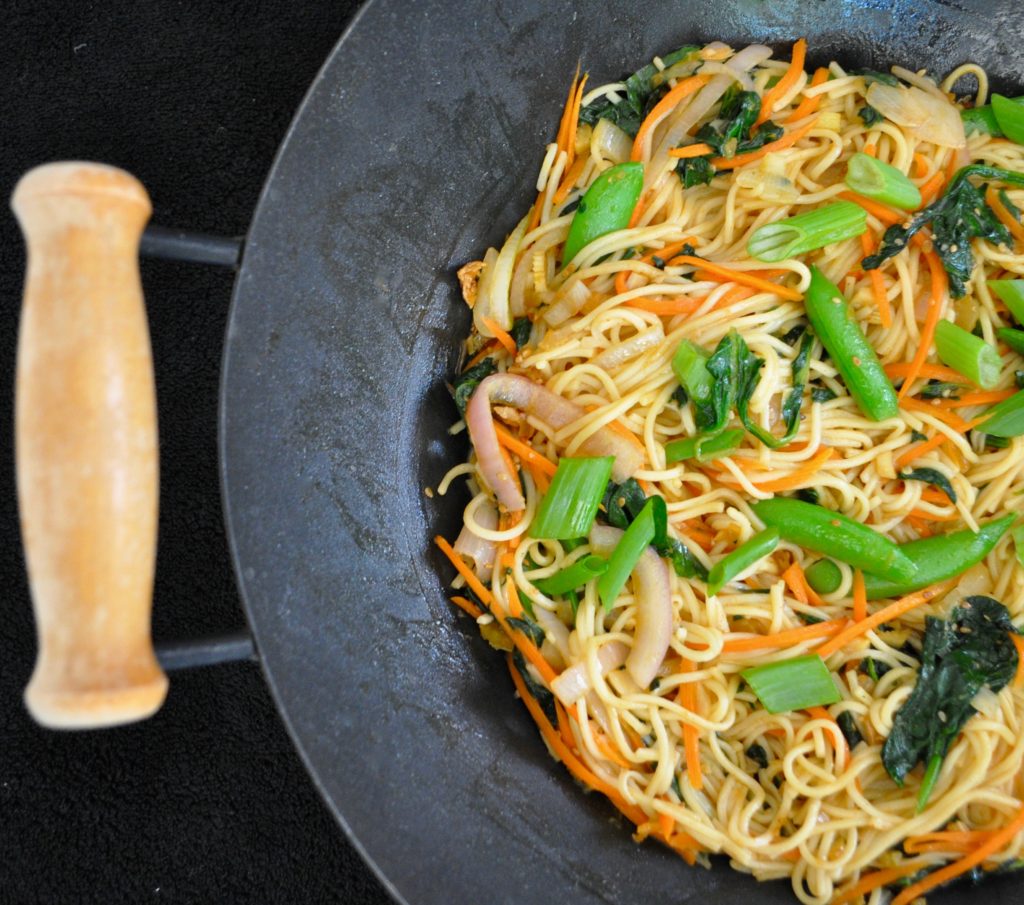
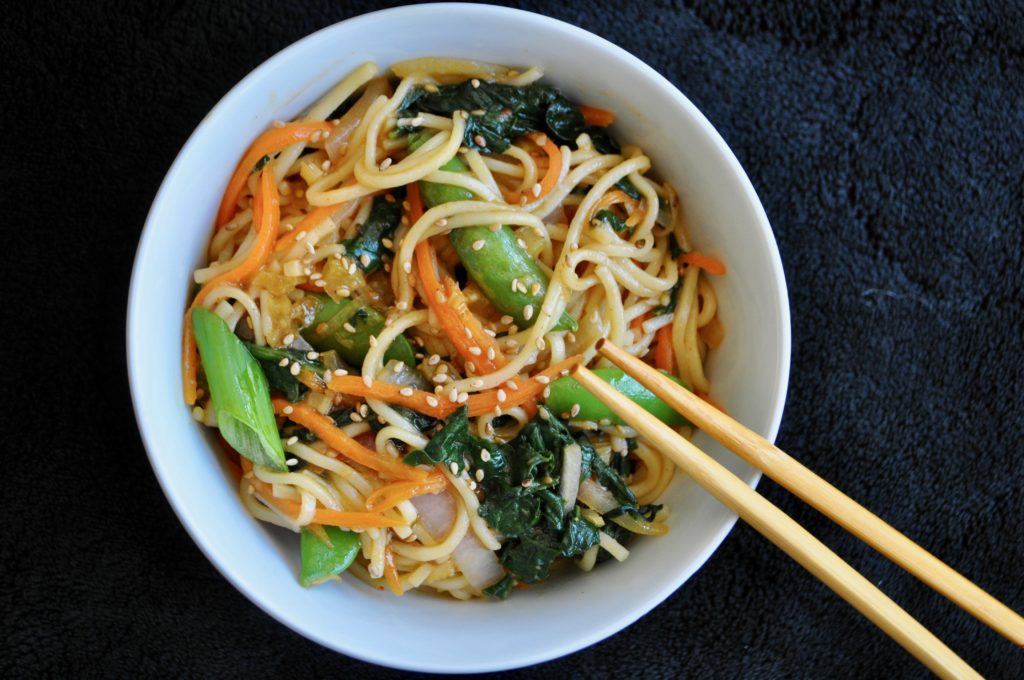
This veggie Szechuan noodles is perfect for those nights when all you can think is noodles, but don’t want to wait for take-out. Indo Chinese Szechuan noodles with sweet-tangy chili sauce, plenty of vegetables, and perfect texture noodles. These quick and healthy vegetable loaded noodles can be made and ready in just about not 30 but 33 minutes. These veggie Szechuan noodles taste better than my go to Chinese take-out!
For a family that loves Chinese food like ours, we don’t have it that often. Our go to Chinese restaurant and take-out is not exactly a bucolic hole-in-the-wall family owned chow-chow place. The food is ok, and the price has gone up recently. The last time we ordered from them I promised myself never ever do it again. That was almost a year ago!
I’ve decided not to break that promised and, since we haven’t found a Chinese take-out place we like, I make some Chinese dishes here and there. And because we normally crave Chinese take-out when we are overly hungry, I end up making Chinese dishes that are quick and easy to throw together.
These Szechuan noodles are seriously the easiest thing ever to make, especially if you have all the ingredients on hand.
Here’s what I did: cooked the noodles to a perfect bite and soaked them in cold icy water so they won’t get soggy. Made the Szechuan sauce in a large wok and reserved it. Lightly fried the veggies in the same wok, drained the noodles, and sautéed with the veggies for about 3 minutes. Seasoned with the Szechuan sauce mixing really well, added chopped green onions, and ATE them! Done and done!
Note: Check my Instagram highlights to see the making of these Szechuan noodles. I hope you try this recipe and if you do, be sure to leave a comment here or on the Instagram post!
Veggie Szechuan noodles
Veggie Szechuan Noodles for those nights when all you can think is noodles, but don’t want to wait for take-out. Indo Chinese Szechuan noodles with sweet-tangy-sesame spicy sauce, plenty of vegetables, and perfect texture noodles. These quick and healthy vegetable loaded noodles can be made and ready in just about not 30 but 33 minutes.
3mediumgreen onions (used only the white bulb (chopped) for the sauce and reserve the green for garnish)
1largecelery stalk finely chopped
sal to taste
For the noodles
12ounces Chinese egg noodles OR spaghetti
1tbspvegetable or canola oil
1smallred onion, sliced
3-5 cupschopped spinach or baby spinach
1-2cupssweet peas
3green onions chopped (the green part unused in the sauce)
2mediumcarrots, julienned
red chili flakes to taste
Method
For the Szechuan sauce
Start by mixing the soy sauce, vinegar, chili paste, and sugar in a separate container. Heat a large skillet or wok over medium heat. Add the oil, garlic, ginger, and green onion whites. Cook, stirring occasionally until the garlic is fragrant, 5 minutes. Stir in the sesame seeds and celery, cook 30 seconds more. Add the liquid mix to the wok, stir for 20 seconds, and reserve in the same container you first prepared the liquid mix.
For the noodles
Meanwhile, cook the noodles according to package directions. Drain and rinse well with cold water. Soak noodles in icy water if necessary, to avoid overcooking.
Return empty wok/skillet to medium-high heat. Heat the oil until smoking and flash sauté the vegetables 2 minutes. Stir in the noodles, turn heat down, and pour in the sauce mixture. Bring the mixture to a simmer and cook until the sauce coats noodles, about 2 minutes.
Remove from the heat. Serve the noodles warm, topped with the green onions. Enjoy!
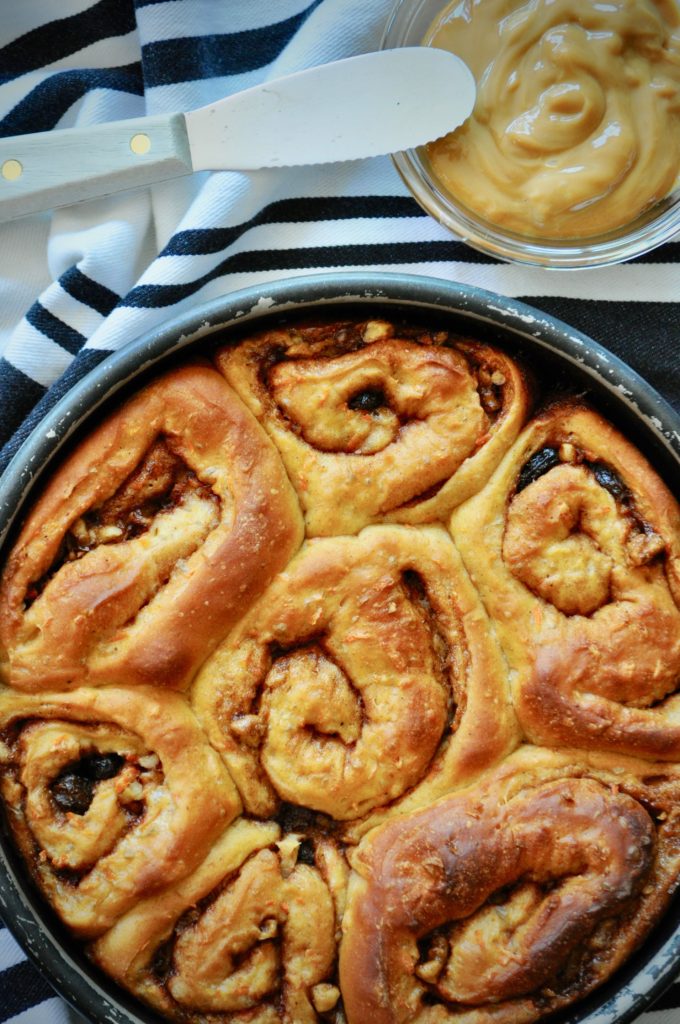
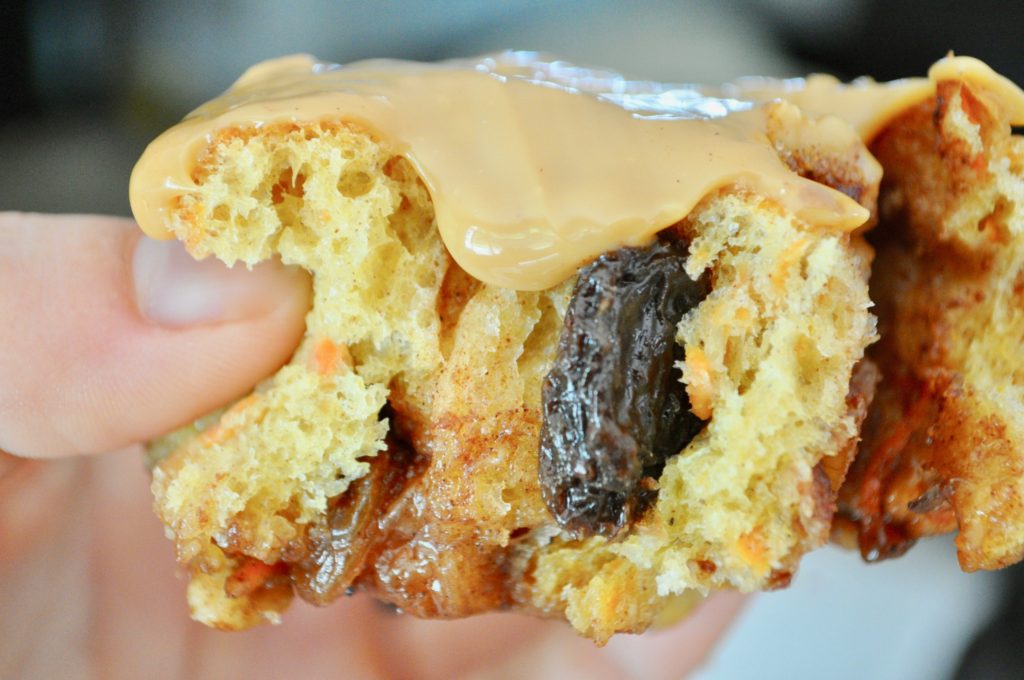
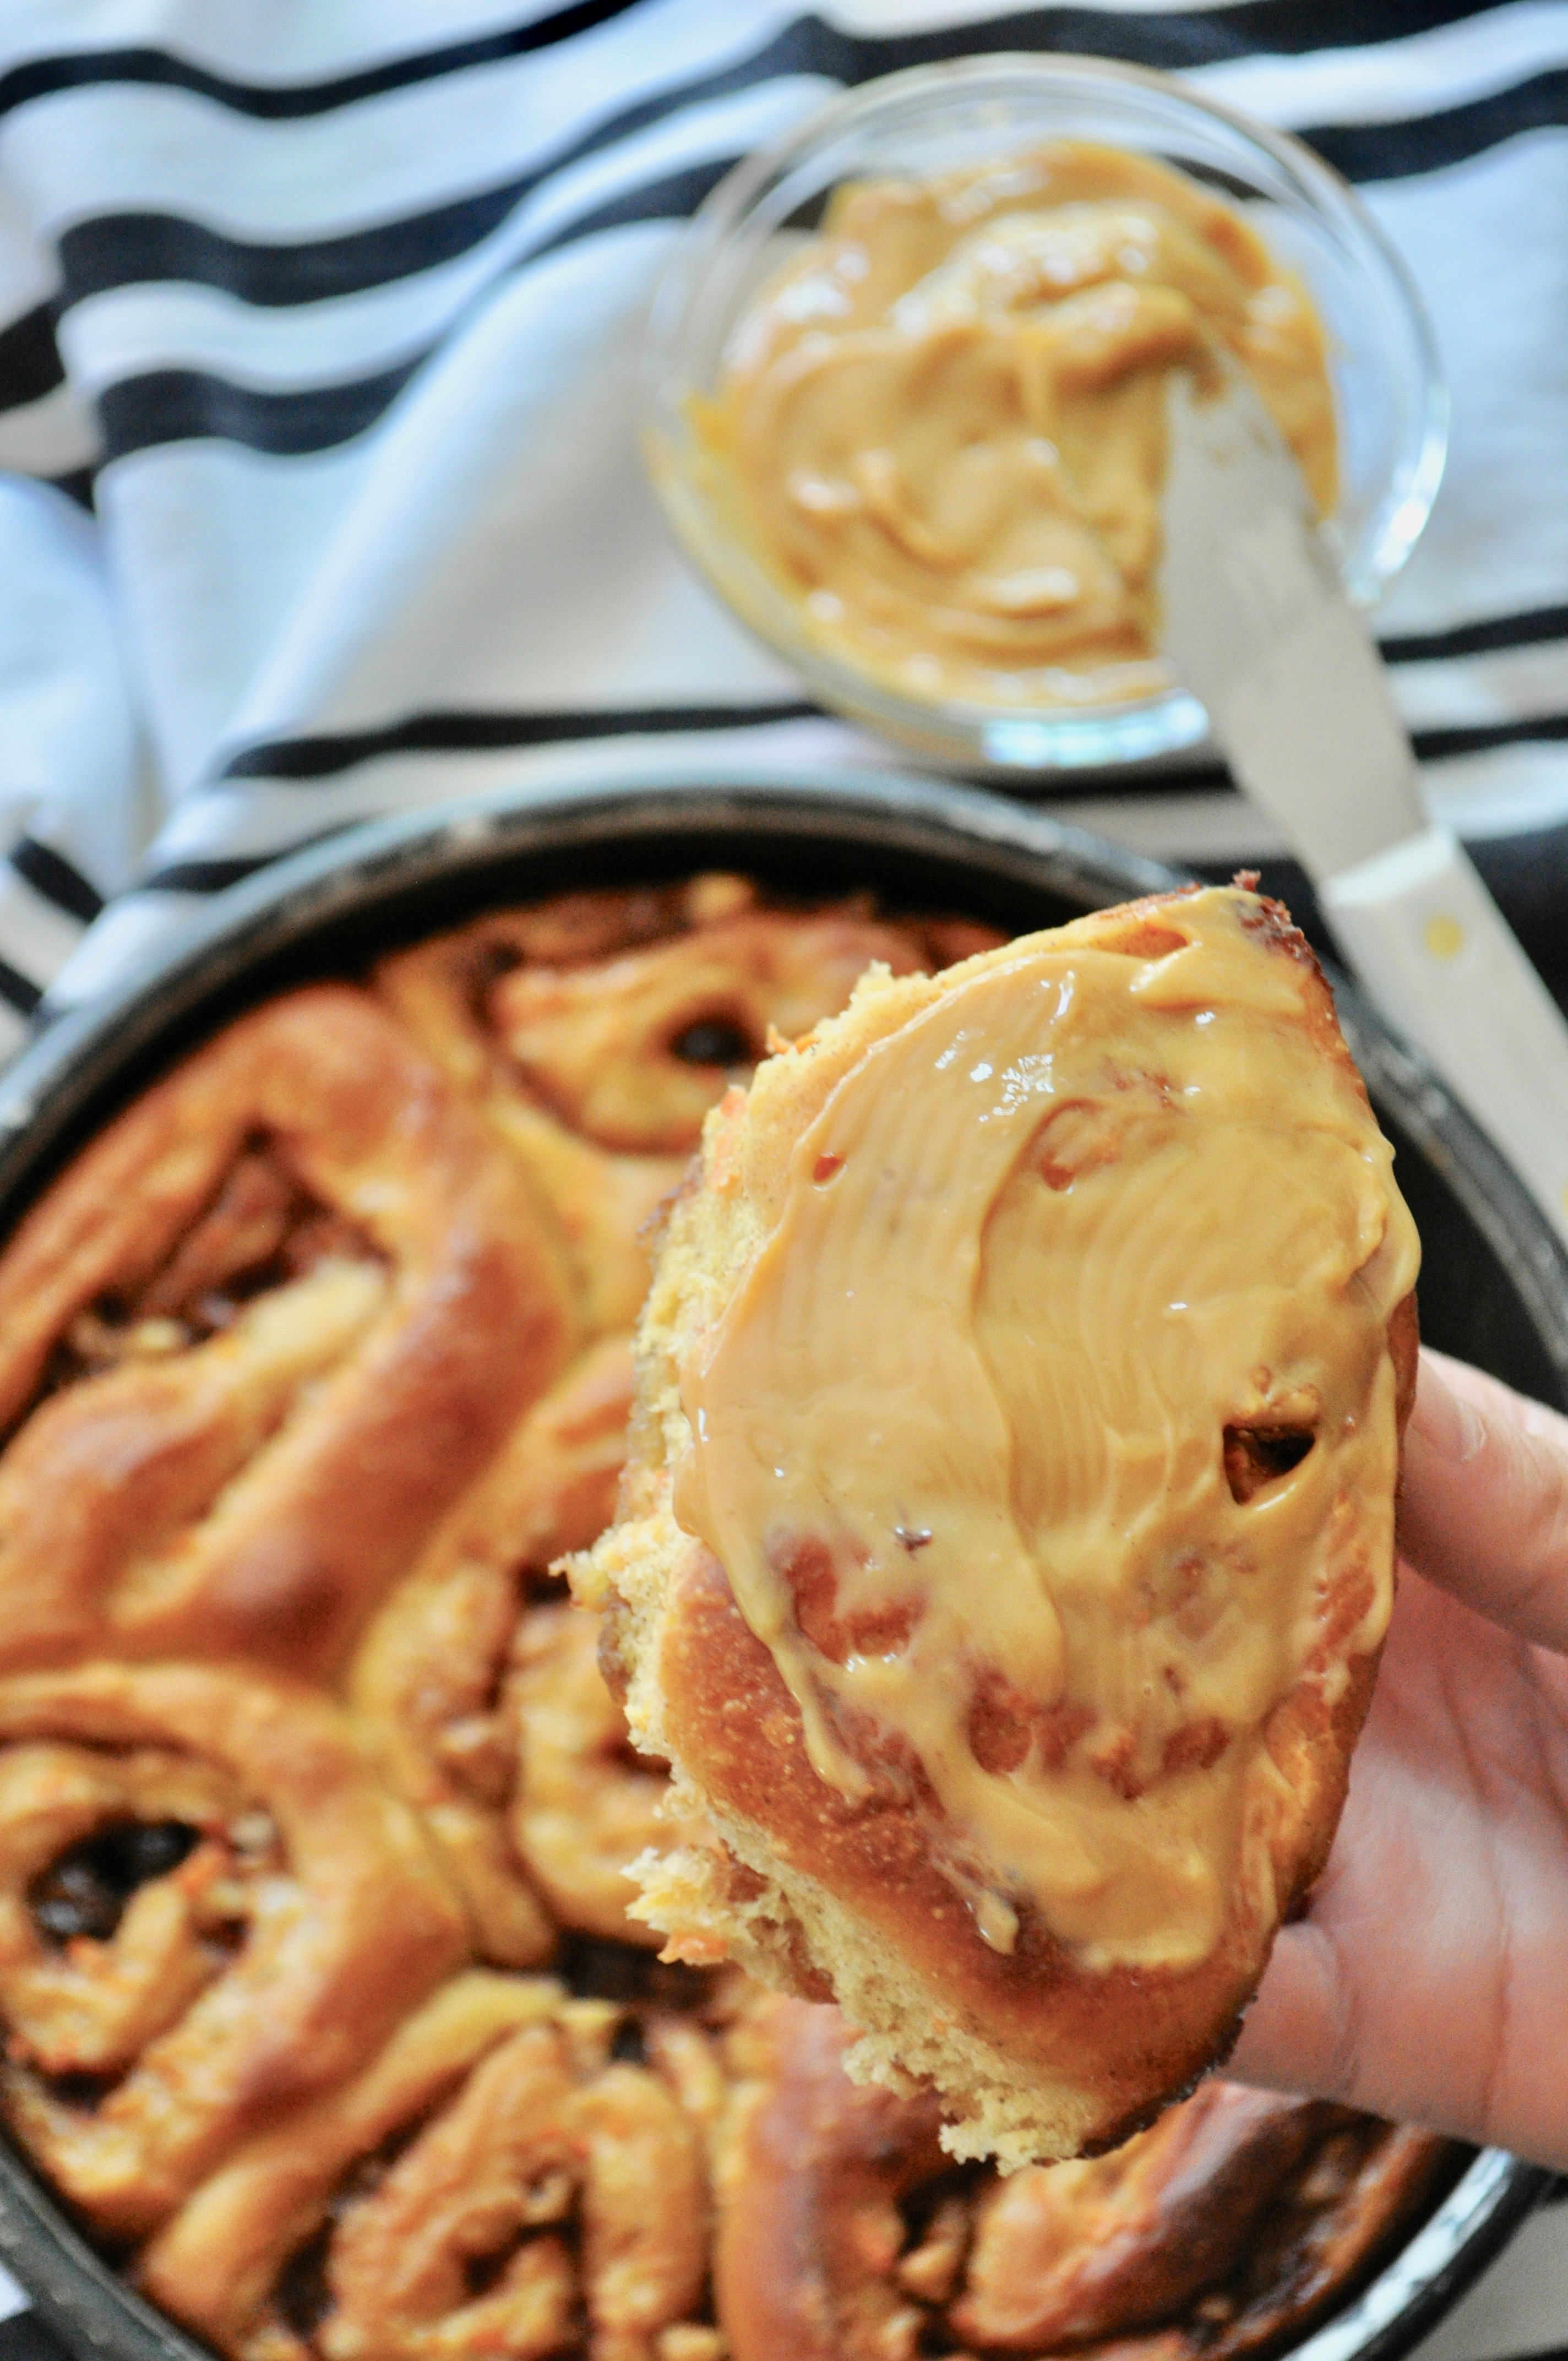
Hello Spring! These carrot cake rolls are a delicious Spring twist on a classic breakfast treat. Loaded with fresh grated carrots, raisins, walnuts, spice, and slathered in ‘dulce de leche’ frosting (yup that’s right) these carrot cake cinnamon rolls will sure make your Spring mornings even sweeter.
Now, the ‘dulce de leche’ frosting was nothing but a lazy moment when I realized I had no cream cheese in the fridge and no desire to get out of my pajama pants to hit the grocery store. I remembered I had a lonely can of dulce de leche in the pantry waiting to meet its destiny; dulce de leche meets carrot cake rolls. The End!
If you happen to try this recipe, feel no pressure to choose dulce de leche as frosting, but know that it is one of the most delicious and perfect combos ever. I highly recommend it!
Carrot Cake Roll with Dulce de Leche Frosting
These carrot cake cinnamon rolls are a delicious Spring twist on a classic breakfast treat. Loaded with fresh grated carrots, raisins, walnuts, spice, and slathered in ‘dulce de leche’ frosting these carrot cake cinnamon rolls be sure to make your Spring mornings even sweeter.
3 1/2cupsall purpose flour and extra to work the dough
1/4cupbrown sugar
1/2tspsalt
2tsppumpkin spice
1/2tspgrated nutmeg
1/2tspginger powder
1 1/2cupgrated carrots
1/2cupgrated coconut (optional)
For the filling
1/2cupmelted butter
1cupbrown sugar
1 1/2tbspcinnamon
1/3cupraisins
1/3cupchopped walnuts
Method
Making the dough
Warm the milk slightly. Sprinkle the yeast over the warm milk and add a pinch of sugar. Stir to combine. Let it rest and activate for 8 minutes.
After the mixture foams, whisk in the melted butter (make sure the butter is not hot), beaten egg and vanilla extract.
Using a regular bowl if you plan to knead the dough by hand OR using a stand mixer fitted with a dough hook, stir together the flour, brown sugar, salt, and spices. Add the wet ingredients all at once to the dry ingredients and use a spatula to just combine. Knead on the dough by hand or with the mixer hook for 4-6 minutes. Add more flour as necessary to create a smooth dough. The dough still will be sticky. Add shredded carrots near the end of the kneading and knead for 2 more minutes.
Leave the bowl in the same bowl, cover with plastic wrap, and allow to rest for 1 1/2 to 2 hours, until doubled in size.
While the dough rests, assemble the filling.
Mixing the filling
In a small bowl toss together sugar, spices, and salt until thoroughly combined.
Making the rolls
To assemble the rolls, dump the risen dough onto a lightly floured work surface. Knead for a few turns. Use a floured rolling pin to roll to a 1/4 inch thickness. Spread it about 10-inches long and 8-inches tall. Drizzle with melted butter, sprinkle with sugar and spice mixture, and sprinkle with raisins and walnuts. Starting from the long end of dough, roll into a tight coil. Slice into 8 even slices. Transfer to a greased round deep cake pan and cover with plastic wrap, allowing the rolls to rise for 30-45 minutes.
Preheat the oven to 350 degrees F. When rolls have risen, remove the plastic wrap and bake for 20 to 30 minutes, until baked though, golden and bubbling.
Remove from the oven and allow to cool for at least 15 minutes before frosting.
Frost generously with dulce de leche or cream cheese frosting and serve warm.